![]()
![]()
![]()
I was not satisfied by the previous version of the tutorial, so
I've completly re-written it completly. Now, I think it is pretty cool.
The tutorial is now better and display a small environment with :
Lighting : A positional light on the ceiling and a spot on the wall.
Material : a particle system is used to render particles emitted from the spot.
The spot light up the particles (in its emission volume) and the
ground. The ceiling light light up all objects in the environment, ie the
wall/ground/ceiling and all particles.
TO BE WRITTEN
The tutorial is not yet written, check in few days/weeks.
In waiting, underneath is the previous version of the tutorials.
![]()
OLD TUTORIAL UNDERNEATH
This is the last tutorial about Lighting and Materials.
This tutorials use all the notions view in the 3 previous tutorials.
It apply material to a small sphere so it emits lights. A light source is placed in the center of this object. The properties of this light source can be choosen using keys.
This sphere light up the scene that is composed of an half-sphere. We can see the effects of the light source on this environment. This enviroment also have specific material properties.
![]()
Here is a description of the scene :
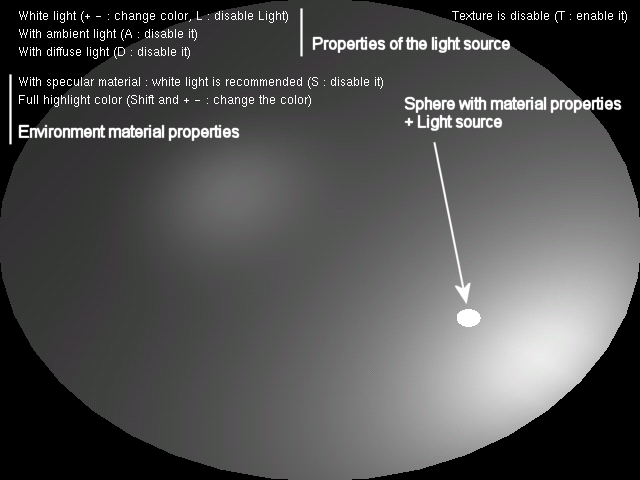
Scene Description
The small sphere is composed in reality of a light source and a sphere with material properties. This sphere use GL_EMISSION property to creates the effects that is emits light.
The environment is only composed of an half of sphere with material properties.
We need to "draw" the light source first so the environment is affected by the light.
After, we draw the small sphere and the half sphere in any order.
To finish, we draw the informations (to view the text over the scene).
Here is the order used :
update light properties (define all properties of the light)
draw the small sphere
draw the half sphere
draw informations (text over the scene)
Drawing |
/********************** |
The ambient, diffuse and specular color used depends on the color choosen by the used (with the keys + and -).
The values are taken in the corresponding color array.
The position is setted to the center of the small sphere.
Here, I use an attenuation with the distance. So the object that are close to the light source are brighter than farther objects. Here, ambient light like the other properties decrease with the distance.
Since we have used no attenuation in the previous tutorials, light affected farther vertex identically than closer vertex.
Values used :
GL_CONSTANT_ATTENUATION = 1.0f
GL_LINEAR_ATTENUATION = 0.2f
GL_QUADRATIC_ATTENUATION = 0.08f
The attenuation factor is :
Attenuation factor = 1/(1+0.2*d+0.08*d^2) //d : distance of the vertex from the light source
This factor is multiplied to the light's color receive by the vertex.
Rem:
If the vertex is at an infinite position compared with the light source, the factor is 0 so the vertex receive no light.)
updateLightSource |
/* |
The small sphere is simple to draw. We only apply it a GL_EMISSION material.
THe value of this property is the color of the light.
The half sphere is drawn with a clipping plane to cut an entire sphere to obtain only the half of it.
GL_AMBIENT and GL_DIFFUSE properties are setted with the value {1, 1, 1, 1}. So, the ambient and diffuse light received is not affected by the material (that is to say do not absord any color).
This object have a particular GL_SPECULAR color. This property define which color is absorb and which is reflected by the highlight. Use the keys + and - with shift to change this value.
The size and intensity is define by GL_SHININESS.
Spheres |
/* |
![]()
The drawing of the text should be view in the Tutorial 19.
![]()
Directional keys : deplace the light source
T : enable/disable texture
L : enable/disable light
A : enable/disable ambient component of the light
D : enable/disable diffuse component of the light
S : enable/disable specular property of the environment
+ - : chenge the light source color (if shift is pressed, it is the highlight color)
![]()
Remember to download the GraphicEngine-1.1.2 to run this tutorial !
Tutorial 15 src (694 ko) //Port to Jogl JSR-231 initially done by Magarrett Dias
If you've got any remarks on this tutorial, please let
me know to improve
it.
Thanks for your feedback.
![]()
![]()
| Copyright © 2004-2012 JĂ©rĂ´me Jouvie - All rights reserved. | http://jerome.jouvie.free.fr/ |