![]()
![]()
![]()
This tutorial is based on DigiBen
's Object Selection Tutorial. The code was improve to pick with a hierarchical picking structure (The Red Book
was usefull to do this).
Recently, I've also improve this tutorial to add picking events trigerred with a
mouse click & dragging. The World Editor
project uses them massively.
The scene is composed of four different objects :
- Ground : click on the ground to use a different texture.
- Pillar : click on a pillar (vertical cylinder) to replace it by another one.
- Viewers : click on a viewer to attach the camera on him.
- The rest : click on it to enable/disable the fog.
![]()
First, we pick-up mouse event to know either the
position or the area of the window to pick objects.
Then, we process the picking composed of these steps :
First, we switch from rendering mode (GL_RENDER) to selection mode (GL_SELECT).
Then, to track object hits in the select buffer, we render the objects by restricting the area to the picking region.
After popping settings, we read in the select buffer to pick-up hits.
There are three possible render modes :
GL_RENDER render
mode to write primitives in the frame buffer. That's the render mode we've used
until here.
GL_SELECT selection mode
to write object it in the select buffer (no rendering on the screen).
GL_FEEDBACK don't need here (used to obtain
informations on primitives that should be drawn).
A mode can be selected with :
gl.glRenderMode(mode)
mode is one of the render mode listed aboce.
The return value of this method is usefull for picking. After rendering in the
GL_SELECT mode and we toogle back to another
mode (generally GL_RENDER) the return value
of glRenderMode is the number of hits/records in
the select buffer.
The select buffer track object 'rendered' in the
picking area.
For each record, ie each object hit, this buffer store the informations :
Number of names in the name stack.
Minimum depth of the object, this value can be used to know the closer object hit when multiple object are present in the pickingarea.
Maximum depth of the object.
List of names of the name stack (see Hierarchical picking).
By reading the select buffer, we can determine (using depth values) which object was selected
If we want to hit the closest object, minimum depth will be usefull. If we want to hit the furthest
object, maximum depth will be usefull.
You NEED to specify a select buffer before calling glRenderMode(GL_SELECT).
For this, use glSelectBuffer(size,
buffer). Size is the size of the buffer, is should be 4 * number of
object pickable (ie number of ID).
Name stack is enabled when we are in the
GL_SELECT mode (else
the call are ignored).
When an object is 'rendered' in this mode, its associated identifier name is the
current state of the matrix stack. Records, in the select buffer, associate the
primitive rendered to the current list of name on the name stack.
The name stack can be manipulated like other stack, you can push/pop a name with
glPushName(name)/glPopName. These
functions acts like glPushMatrix/glPopMatrix for the matrix stack.
The name on the top of the name stack can be replace with glLoadName(name)
(to use this method, at least a name have to be pushed
on the name stack).
The code for rendering is detailled here.
Mouse events are tracked with MouseListener &
MouseMotionListener. This is not detailled here as it is already seen in some
previous tutorials.
After a picking point or region is caught with these listeners, in the next
display (when the GLContext is current), the
picking event is processed.
We start by creating the select buffer, according to the
maximum number of object to pick and the maximum name stack depth.
|
Select mode |
//Calculate select buffer
capacity and allocate data if necessary |
We restrict the picking area to the area selected by
the mouse. For this, we will use gluPickMatrix.
gluPickMatrix(x,
y, width,
height,
viewport)
The 4 first parameter is the picking area (center and size).
viewport is the viewport, use
GL_VIEWPORT & glGet*
to retrieve it (see underneath).
|
Restrict picking area |
|
//Get viewport &
projectionmatrix |
We return to GL_MODELVIEW
matrix mode and render object that can be picked (not the whole scene) like describe here.
|
Drawing |
//Go back to modelview for
rendering |
Object picked are recorded in the select buffer, the
number of hit can be easily obtaine using glRenderMode
(like explained here).
Here we will read in this buffer to search the closer object picked.
Effectively, in many cases, more than one object can be rendered in the same
window area.
For each record, we will read the second integer to know the minimum depth. If
this value is smaller than the previous depth, the object is closer. In this
case, we read the list of names and store them in an array that will be process
after the search step.
|
Searching closest object picked |
//Switch back to render mode
& get the number of hits/records in the select buffer |
Note: Depending on the
picking event processed (click or drag), the either want a single (closer hit)
or multiple selection (all hits). This is supported by DefaultPicking class
which is not fully detailled here for simplicity.
The name stack allow pushing multiple names. This feature is really
powerfull and usefull for organizing our objects and their names. We will use it
here to identify easily each king of objects with a hierarchical name (multiple
names).
We have three kind of objects : the pillar, the viewer and the ground. As we
have multiple pillars and multiple viewers, we will create a group of each kind
of object.
The parent name of pillars will be OBJECTS and the parent name for the viewers
will be VIEWERS. Child names (in the second level of the stack), is the index of
the object in our list.
Ex: OBJECTS->3 is used to identify the 4th pillar (pillar at the index
3 in our list).
Name hierarchy used in this tutorial (objects points toward pillars) :
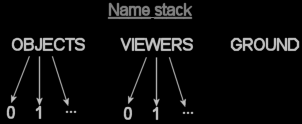
Scene hierarchy
The maximum depth of the name stack is 2 in this example. For more
complex scene, you can use a higher depth if necessary.
The following code identify three kind of objects respectively by the name 1, 2 and 3.
|
Using name stack |
|
//Initialize the name stack (empty) |
|
Using name stack (2) |
|
private void drawPillars() |
Now we have picked an object, we process the name list to search the associated object :
|
Processing object picked |
public void processPicked(int[] selection) |
![]()
Remember to download the GraphicEngine-1.1.2 to run this tutorial !
Tutorial 27 src (19 ko) //Port to Jogl JSR-231 initially done by Magarrett Dias
If you've got any remarks on this tutorial, please let
me know to improve
it.
Thanks for your feedback.
![]()
![]()
| Copyright © 2004-2012 JĂ©rĂ´me Jouvie - All rights reserved. | http://jerome.jouvie.free.fr/ |