
Tutorial 03 :
Fullscreen loader v2.0 - BaseCode
Thanks to Pepijn Van Eeckhoudt, I've learn how to render a frame in full screen mode and to choose the screen resolution.
I found it in the port of GLExcess written originally by Paolo Martella.
You can found GLExcess at:
http://www.glexcess.com/
GLExcess is a beautifull OpenGl demo that show many effects through differents environments.
When I've see this demo, I'm impressed by the work of Paolo Martella. It is very incredible !
The goal of this tutorial is to load the OpenGl frame container
created previously in fullscreen mode.
It will also allow the use to select, in a dialog, the screen resolution, scene dimension (if
he don't want to load it in fullscreen mode).
To load an OpenGL scene in the default container, the code will look like :
|
Loading an OpenGl scene in the default GUI |
|
public static void main(String[] args)
{
Load.load("Title of the frame",
Tutorial3.class,
Settings.Renderer.JOGL_JSR231)
// Load.load(OpenglGui.class,
//
"Title of the frame",
// Tutorial3.class,
// Settings.Renderer.JOGL_JSR231) } |
This Tutorial contains many files, here is all packages/classes used :
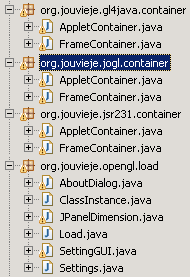
Class hierarchy
How to use all of this ?
The main class is org.jouvieje.opengl.load.Load.
It is the entry point for :
-
Displaying the setting GUI (SettingGUI
class) to ask if the scene should be loaded in fullscreen mode and whi
size/resolution (settings stored in Settings
class).
-
Create the container/gui : instanciate (ClassInstance
class) the default container (from
org.jouvieje.***.container package) or the specified container.
The default container is choosen depending of the value Settings.Renderer.***
(GL4JAVA, JOGL or JOGL_JSR231).
-
New instanciate (ClassInstance
class) of the OpenGl scene, add in the container/gui.
-
Finally, starts the animation !
GlLoader put the second parameter (the class that contain the scene) in the container constructor.
With this class, we can instanced a new object to creates the scene and add it into the frame.
The container must implements GlContainer that is to say defines this two classes of the interface.
We will see afterwards that you can use you own containers and passed it as a Class like the scene on a method of GlLoader.
|
org.jouvieje.opengl.scene.SceneContainer |
package
org.jouvieje.opengl.scene;
public abstract interface SceneContainer<T>
{
public void start();
public void setVisible(boolean visible);
public T getGlScene();
} |
Using other container
Not only default container can be passed to Load class. Any container that
implements SceneContainer can also be used.
The container must have a constructor with these parameters :
String title, Class<?> scene,
Settings<?> settings
-
The Jogl/Jogl-JSR231 container
The class that contains the scene must implements GLEventListener like we have seen in Tutorial 2.
The settings choosen by the user and the opengl scene to add in the container
are passed to the constructor.
To instanciate the class, we will use ClassIntance
which use internally Constructor.newInstance.
Settings store these 4 properties :
- fullscren mode fulscreen mode activated ?
- screen resolution the resolution of the screen, if
fullscreen mode is activated
- scene dimension dimension of the OpenGL scene,
if fullscreen mode is disabled
- renderer
define if we use Gl4java, Jogl or Jogl-JSR231
Here is the full code of the new container, with highlight of important code
:
|
opengl.jsr231.Container.FrameContainer |
package org.jouvieje.jsr231.container;
import java.awt.*;
import java.awt.event.*;
import javax.swing.*;
import net.java.games.jogl.*;
import opengl.common.Container.*;
import opengl.common.Loader.*;
public class FrameContainer extends JFrame implements
SceneContainer<javax.media.opengl.GLCanvas>
{
protected final Class<?> glSceneClass;
protected final Settings settings;
private javax.swing.JPanel jContentPane = null;
private net.java.games.jogl.GLCanvas glScene = null;
private GLEventListener glEvents = null;
public FrameContainer(String title, Class<?> scene,
Settings<?> settings)
{
super(title);
this.glSceneClass = scene;
this.settings = settings;
initialize();
}
public void start()
{
getJContentPane().add(getGlScene(),
java.awt.BorderLayout.CENTER);
this.pack();
this.setLocationRelativeTo(null);
getGlScene().requestFocus();
}
...
private void initialize()
{
this.setUndecorated(settings.isFullscreen());
this.setContentPane(getJContentPane());
...
}
public void destroy()
{
try
{
if(settings.isFullscreen())
{
GraphicsDevice graphicsDevice =
GraphicsEnvironment.getLocalGraphicsEnvironment().getDefaultScreenDevice();
graphicsDevice.setFullScreenWindow(null);
graphicsDevice = null;
}
}
catch(Exception ee)
{
System.err.println("[FrameContainer.destroy] PROBLEM WHEN EXITING FULLSCREEN
MODE !");
}
}
private javax.swing.JPanel getJContentPane()
{
if(jContentPane == null)
{
jContentPane
= new javax.swing.JPanel();
jContentPane.setLayout(new java.awt.BorderLayout());
jContentPane.setBackground(java.awt.Color.black);
}
return jContentPane;
}
public javax.media.opengl.GLCanvas getGlScene()
{
if(glScene == null)
{
GLCapabilities glCapabilities = settings.glCapabilities instanceof
GLCapabilities ?
(GLCapabilities)settings.glCapabilities : new GLCapabilities();
glScene = new
GLCanvas(glCapabilities);
if(settings.isFullscreen())
glScene.setSize(settings.getScreenResolution());
else
glScene.setSize(settings.getSceneDimension());
try
{
glEvents =
(GLEventListener)ClassInstance.sceneInstance(this, glSceneClass);
glScene.addGLEventListener(glEvents);
}
catch(Exception e)
{
System.out.println(e.getClass()+" : "+e.getMessage());
e.printStackTrace();
System.err.println("[FrameContainer.getGlScene] FAILED TO INITIALIZE THE OPENGL
SCENE !");
this.dispose();
}
}
return glScene;
}
...
} |
The code is similar to JOGL-JSR231, here are major changes :
|
org.jouvieje.gl4java.container.FrameContainer |
public gl4java.awt.GLAnimCanvas getGlScene()
{
if(glScene == null)
{
try
{
glScene =
(gl4java.awt.GLAnimCanvas)ClassInstance.sceneInstance(this,
glSceneClass,
settings.isFullscreen() ? settings.getScreenResolution() :
settings.getSceneDimension());
glScene.addFocusListener(new java.awt.event.FocusListener() {
public void focusGained(java.awt.event.FocusEvent e) {
FrameContainer.this.focusGained(e);
}
public void focusLost(java.awt.event.FocusEvent e) {
FrameContainer.this.focusLost(e);
}
});
glScene.addMouseListener(new java.awt.event.MouseAdapter() {
public void mouseEntered(MouseEvent me) {
FrameContainer.this.mouseEntered(me);
}
public void mouseClicked(MouseEvent me) {
FrameContainer.this.mouseClicked(me);
}
});
}
catch(Exception e)
{
System.out.println(e.getClass()+" : "+e.getMessage());
e.printStackTrace();
System.err.println("[FrameContainer.getGlScene] FAILED TO INITIALIZE THE
OPENGL SCENE !");
this.dispose();
}
}
return glScene;
} |
For this, we use the class java.awt.GraphicsDevice. First, we gets the default GraphicsDevice with :
GraphicsEnvironment.getLocalGraphicsEnvironment().getDefaultScreenDevice()
Afterwards, we put our frame in fullscreen mode with :
graphicsDevice.setFullScreenWindow(glContainer)
Finaly, we change resolution, bit depth, refresh rate ... with :
graphicsDevice.setDisplayMode(displayMode)
The displayMode is choosen between all display modes available. Display modes available can be
acess via :
graphicsDevice.getDisplayModes()
|
org.jouvieje.opengl.load.Load |
package
org.jouvieje.opengl.load;
import java.awt.*;
import javax.swing.JDialog;
import org.jouvieje.opengl.scene.SceneContainer;
public class Load
{
...
public static SceneContainer<?> loadScene(Class<? extends
SceneContainer<?>> container, String title, Class<?> scene, Settings<?>
settings)
{
SceneContainer<?> glContainer = null;
try
{
glContainer =
ClassInstance.containerInstance(container, title, scene, settings);
}
catch(Exception e)
{
e.printStackTrace();
System.err.println("[Loader] : "+e.getMessage());
System.exit(1);
}
try
{
if(settings.isFullscreen() && glContainer instanceof Window)
{
switchToFullscreenMode((Window)glContainer, settings);
}
}
catch(Exception e)
{
System.err.println("[Loader] PROBLEM WITH FULLSCREEN MODE !");
}
glContainer.start();
glContainer.setVisible(true);
return glContainer;
}
private static void switchToFullscreenMode(Window
glContainer, Settings<?> settings)
{
GraphicsDevice graphicsDevice =
GraphicsEnvironment.getLocalGraphicsEnvironment().getDefaultScreenDevice();
graphicsDevice.setFullScreenWindow(glContainer);
DisplayMode displayMode =
catchDisplayMode(
graphicsDevice.getDisplayModes(),
settings.getScreenResolution().width,
settings.getScreenResolution().height,
graphicsDevice.getDisplayMode().getBitDepth(),
graphicsDevice.getDisplayMode().getRefreshRate());
graphicsDevice.setDisplayMode(displayMode);
}
private static DisplayMode catchDisplayMode(DisplayMode[] displayModes, int requestedWidth, int requestedHeight,
int requestedDepth, int requestedRefreshRate)
{
DisplayMode displayMode = searchDisplayMode(displayModes, requestedWidth, requestedHeight,
requestedDepth, requestedRefreshRate);
if(displayMode == null)
{
displayMode = searchDisplayMode(displayModes, requestedWidth, requestedHeight,
-1, -1);
if(displayMode == null)
{
displayMode = searchDisplayMode(displayModes, requestedWidth,
-1, -1, -1);
if(displayMode == null)
displayMode = searchDisplayMode(displayModes,
-1,
-1, -1, -1);
}
}
else
{
System.out.println("Perfect DisplayMode Found !!!");
}
return displayMode;
}
private static DisplayMode searchDisplayMode(DisplayMode[] displayModes, int requestedWidth, int requestedHeight,
int requestedDepth, int requestedRefreshRate)
{
DisplayMode displayModeToUse = null;
for(int i = 0; i < displayModes.length; i++)
{
DisplayMode displayMode = displayModes[i];
if((requestedWidth ==
-1 || displayMode.getWidth() == requestedWidth) &&
(requestedHeight ==
-1 || displayMode.getHeight() == requestedHeight) &&
(requestedHeight ==
-1 || displayMode.getRefreshRate() == requestedRefreshRate) &&
(requestedDepth ==
-1 || displayMode.getBitDepth() == requestedDepth))
displayModeToUse = displayMode;
}
return displayModeToUse;
}
} |
-
Sample of the use of this Base Code
Display setting gui and loads the scene
Load.load("Tutorial 3", Tutorial3.class,
Settings.Renderer.RENDERER_JOGL)
Display setting gui with preferred settings (fullscreen in 800x600) :
Settings settings = new Setting(Settings.Renderer.RENDERER_JOGL, true, new Dimension(800, 600))
Load.load("Tutorial 3", Tutorial3.class, settings)
Loads directly the scene in the default container without displaying the
settings gui :
Settings settings = new Settings(Setting.Renderer.RENDERER_JOGL, true, new Dimension(800, 600))
Load.loadScene("Tutorial 3", Tutorial3.class, settings)
Loads the scene in a specific container (detailed here)
:
Load.load(YourOwnContainer.class, "Tutorial 3", Tutorial3.class,
Setting.Renderer.RENDERER_JOGL)
Until now, I didn't told you about how to creates the html code and to add an applet.
Here is a short explanation to do this.
The structure of an html page is :
| HTML structure |
<HTML>
<HEAD>
</HEAD>
<BODY>
</BODY>
</HTML> |
To put an applet in that page, we use the APLLET tag into the BODY block.
code : indicates the class to load
archive : indicates a jar file to put in the classpath
glScene : a specific parameter readed by AppletContainer to
know which scene must be shown.
I also added text to show you how to use the tag <P> (paragraph).
| HTML structure + Text + Applet |
<HTML>
<HEAD>
</HEAD>
<BODY>
<P>Jouvieje's Tutorials 03 - Fullscreen Loader v2.0 - Thanks to Pepijn Van Eeckhoudt</P>
<APPLET CODE=org.jouvieje.gl4java.container.AppletContainer.class HEIGHT=480 WIDTH=640>
<PARAM NAME=archive VALUE="Tutorial03.jar, BaseCode.jar">
<PARAM NAME=glScene VALUE="org.jouvieje.gl4java.tutorials.Tutorial3">
</APPLET>
</BODY>
</HTML> |
The APPLET tag is the most used to loads an applet in an html page.
But, here is an alternative (prefered) way to do this :
| File Name |
<HTML>
<HEAD>
</HEAD>
<BODY>
<OBJECT CODETYPE="application/java"
CLASSID="java:org.jouvieje.gl4java.container.AppletContainer.class"
HEIGHT=480 WIDTH=640>
<PARAM NAME=archive VALUE="Tutorial03.jar, BaseCode.jar">
<PARAM NAME=glScene VALUE="org.jouvieje.gl4java.tutorials.Tutorial3">
</OBJECT>
</BODY>
</HTML> |
Remember to download the GraphicEngine-1.1.2 to run this tutorial !
If you've got any remarks on this tutorial, please let
me know to improve
it.
Thanks in advance for your feedback.
| Copyright © 2004-2012 JĂ©rĂ´me Jouvie - All rights reserved. |
http://jerome.jouvie.free.fr/ |