![]()
![]()
![]()
Now, we can begin the OpenGl tutorials. All the tutorials will runs
eiher with Gl4java, Jogl and Jogl JSR231.
This first tutorials will learn you how to draw simple shapes like triangles, quads.
By association of simple 2D shapes, we can creates 3D shapes like a pyramid
(composed of 4 triangles and 1 quad) and a cube (composed of 6 quads).
We will also view how to add colors and see the differents render : point, linear and fill.
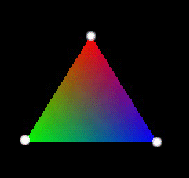
To draw a simple shape like a triangle, we need the coordinates his
3 vertices.
These vertices are marked in white in the following picture :
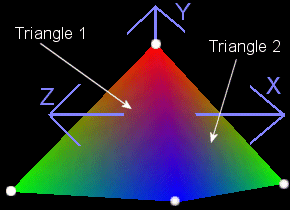
In a 3D world, coordinates of a vertex are represented by 3 values (x, y, z) in the axis system :

x is the position in the X axis, y is the position on the Y axis ...
The origin (the center) of the axis system is the point (0, 0, 0). This point is in the center of the scene
(this is done when reseting transformation matrix with
glLoadIdentity). We can apply transformations such as translation,
rotation and scaling to the axis system.
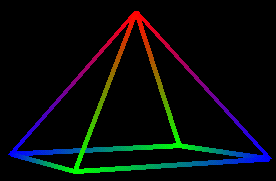
By combining tringles, we can creates the pyramid shown on the screen shot of the tutorial.
For the cube, we will use a combination of quads.
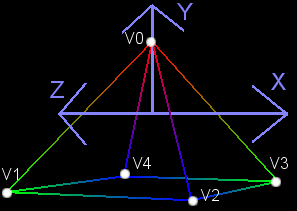
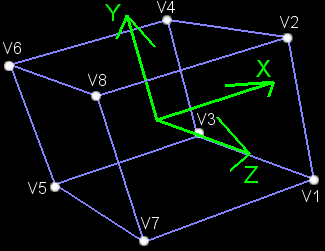
Here is the pyramid represented with its axis system, vertices are marked with white points :
 |
 |
| Pyramid rendered with GL_FILL | Pyramid rendered with GL_LINE |
To draw this pyramid, we will draw each of its 4 triangles
successively.
The pyramid have 5 differents vertices that will be called V0, V1, V2 ...
The first triangle is composed of the vertex V0, V1 and V2,
which have the coordinates :
V0 = ( 0, 1, 0)
V1 = (-1, -1, 1)
V2 = ( 0, -1, 1)
Each vertices have a color.
The color used by OpenGL is in RGB mode. The color is also composed of 3 components : (r, g, b).
Each component defines the percentage of red(r), green(g) and blue (b). The value of each component must be include in the interval [0.0f, 1.0f]
V0 is affected by the color red = (1.f, 0.f, 0.f)
//r=1 means full red
V1 is affected by the color green = (0.f, 1.f, 0.f)
//g=1 means full green
V2 is affected by the color blue = (0.f, 0.f, 1.f)
//b=1 means full blue
Here is some examples forOther colors :
whith = (1.f, 1.f, 1.f)
//full of red, green and blue make white
black = (0.f, 0.f, 0.f)
//no color
To draw a vertex (x, y, z), we use the OpenGl method :
gl.glVertex3f(x, y, z)
The color affected to this vertex is the current color defined. To affect a color
on a vertex, we simply set the current color before calling glVertex. This is done with :
gl.glColor3f(r, g, b)
//Default : white
The calls glVertex must be placed into a bloc
glBegin / glEnd.
With this block, we tells OpenGl that want to draw primitive shape.
The kind of shape drawn is specified with the parameter of
glBegin. The following picture, taken from The Red Book,
shows all primitive shape with their corresponding parameter :

Picture Copyrigth @ Addison-Wesley Publishing Company
For drawing a pyramid, we can either use :
GL_TRIANGLE Draw sucessively 4 independant triangles, this will result on drawing 12 vertices.
GL_TRIANGLE_FAN Take the advantage of common vertices of the pyramid, this will result on drawing 6 vertices.
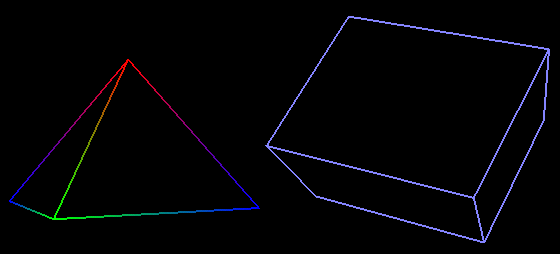
Here is two rendering way for displaying a pyramid :
| Drawing of the pyramid |
Method 1 : using GL_TRIANGLES |
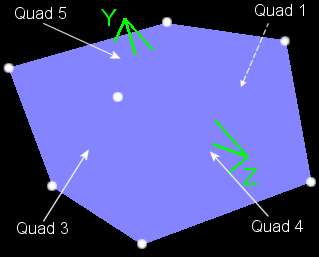
Now the cube, here is the description of the cube that will be drawn :
 |
 |
Cube rendered with GL_FILL |
Cube rendered with a GL_LINE |
To draw this shape, you can use GL_QUADS or GL_QUAD_STRIP.
You can remarks that I carry of the order of the glVertex calls. The order defines the face orientation, see Tutorial 5 : Face orientation for more information on this.
One side of the face is front (GL_FRONT),
the other is back (GL_BACK).
| Drawing of the cube |
Method 1 : using GL_QUADS |
Remarks :
GL. in front of the OpenGl constant is for
Jogl (don't need with Gl4java because GLAnimCanvas
extends GLEnum).
![]()
A transformations is either a translation, a rotation or a scale.
The drawing is performed in the transform coordinate system.
We use a translation to move the pyramid to the left and the cube to the right.
Without transformatrion, the cube and the pyramid will be superimposed.
Read Lesson 1 & Lesson 2 for more informations about
transformations.
Before drawing the objects, we begin to translation the center of the
coordinate system where the pyramid will be drawn.
To position the pyramid to the left, we just have to translate the axis system like this :
gl.glTranslatef(xTranslation, yTranslation, zTranslation)
For the pyramid, we translate from these values (-1.5f, 0.0f, -8.0f)
The coordinate system center will be translated to 1.5 units to the left and 8
units backwards.
The raison why we translate along z axis is that initialy the coordinate
system is on the near plane of the viewing volume. This is better explained in the Lesson 1.
To position the cube, there are differents solutions :
glLoadIdentity reset transformations
applyed to the coordinate system.
To rotate the system axis around its center, we use the command :
gl.glRotatef(angle, xAxis, yAxis, zAxis)
The *Axis parameters is a unit vector defining
the axis of rotation (ĂŞ on the picture). It represents a unit vector.
The angle parameter is the rotation angle in
degree (θ on the picture).
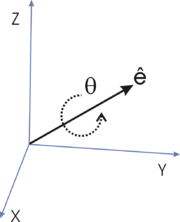
Axis/Angle rotation, picture from
Wikipedia
Here, we want the shape to rotate around the vertical axis.
Vertical axis is y, so the direction is (0, 1, 0), rotPyramid represents the
rotation angle is degree :
gl.glRotatef(rotPyramid, 0.0f, 1.0f, 0.0f) //rotation
around y axis
![]()
We have seen two differents render in the previous pictures ie
face filled or render as line.
The rendering style is defined with :
gl.glPolygonMode(face, mode)
face parameter is either GL_FRONT_AND_BACK, GL_FRONT or GL_BACK
mode parameter is either GL_POINT, GL_LINE or GL_FILL
In this tutorial, shapes are render so :
GL_FRONT face seen we are in the outside of the shape.
We will see in the Tutorial 5 : Face Orientation how OpenGl determine the front and the back face of an object.
We can hide a face (GL_FRONT or
GL_BACK) to optimize drawing performance.
For this, enable culling mode represented as
GL_CULL_FACE. To activate it, use the command glEnable. To face
culled is specified with glCullFace.
gl.glCullFace(face)
gl.glEnable(GL_CULL_FACE)
Here is an exemple of a hidding the back face of the previous screen shots :
Scene using glCullFace(GL_BACK)
This mode defines how the color is propagated around a vertex. To select a mode, we use :
gl.glShadeModel(mode)
mode is one of these two values :
GL_FLAT : same color to all the face
GL_SMOOTH : gradation of colors around the vertex (colors
is mixed between two vertices)
All the screen shots are taken with a smooth shading model. The following
picture uses a flat rendering :
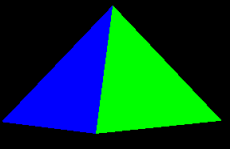
Pyramid with a GL_FLAT ShadingModel
We can defines the width of the lines with :
gl.glLineWidth(width)
Width is a float that defines the width of the line. The default value is 1.f.
Exemple of a line width equal to 5.f :
Pyramid with a LineWidth equal to 5.f
![]()
C : hide/view back face
R : switch between GL_LINE & GL_FILL render
P : pause the rotation of the shapes
![]()
Tutorial 4 src (8 ko) //Port to Jogl JSR-231 initially done by Magarrett Dias
If you've got any remarks on this tutorial, please let
me know to improve
it.
Thanks for your feedback.
![]()
![]()
| Copyright © 2004-2012 JĂ©rĂ´me Jouvie - All rights reserved. | http://jerome.jouvie.free.fr/ |