![]()
![]()
![]()
This is the second version of this Tutorial. I've completly changed all picture loaders (Third parties) by my own loaders.
Ron Sullivan and konik
loaders helps me a lot when I begin to learn opengl.
Big thanks to them !
The new loader now loads PNG, BMP, JPG and GIF pictures. You need at least Java 1.5 to
have use these formats.
I only keeps TGA loader written by Ron Sullivan
(and fix compressed tga).
![]()
In this tutorial, we will add texture of the cube of the previous tutorial.
A texture is a picture that can be used in an OpenGl scene. The texture is generaly created using an existing image (png, bmp ...).
The first part of this tutorial show you how to creates a texture from an existing image file.
The second part learn you how to use texture generated in the first part.
This is composed of 2 phases :
![]() reading
each pixel color of an image
reading
each pixel color of an image
![]() generate a texure
from datas read
generate a texure
from datas read
Here are related classes for texture loading and creation :
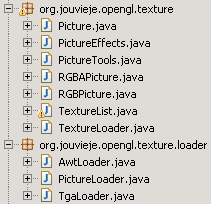
Texture package
The reading of the image files is done by picture loader from
the package org.jouvieje.opengl.texture.loader. Each loader implements PictureLoader.
The two picture loaders are :
AwtLoader : png, jpg, bmp
& gif pictures (and other format support by java).
TgaLoader : tga pictures.
//Created by Ron Sullivan
This phase is not explicated in this tutorial but you can take a look to source files by your own.
The reading of a picture file creates a byte array that contains the color of each pixels of our picture. This array will be used in the second phase to generate a texture.
Here is a representation of the array created by the picture loader, for an
rgba picture :

Pixel colors storing
For a rgb picture, alpha component is omitted.
The size recommanded of an image is a power of 2, like 64x64 pixels, 128x128, 256x256 ...
Too big pictures will takes noticeable loading time and, aboce all,
substantial memory use.
The texture generated is stored internaly by opengl.
After the creation, we will have an reference (int) to the texture, this is the
texture name. We will use
this name to refer to this texture for subsequent use.
First, we begin to generates a name for our texture using
glGenTextures :
gl.glGenTextures(nbNames, textures)
textures is an int array that holds textures
names.
nbNames is the number of ID to generates in textures array.
Then, we bind ('select') our texture in a target. Target is commonly
GL_TEXTURE_2D (2 dimensional texture). But,
other tagets can be used like seen in Tutorial 11.
All the following texture manipulations will affects the texture binded .
gl.glBindTexture(target,
name)
target is GL_TEXTURE_2D
name is the texture name to bind/select in the
target.
The line glPixelStorei specify the pixel
storage mode. It affects how glTexImage2D
reads pixels stored in memory (our array).
This line specify that all bytes are aligned :
gl.glPixelStorei(GL.GL_UNPACK_ALIGNMENT,
1)
The two glTexParameteri lines defines the filters used when the texture is scaled (resized) during the drawing.
See Tutotial 6 for more informations on filter and
their effect on the rendering quality.
With the last call, we construct the texture with the representation of the picture file (byte array). Two methods can be used,
you can see the parameters used for these two methods are similar :
glTexImage2D(target, level, internalFormat, width, height, border, format, type, data)
gluBuild2DMipmaps(target, internalFormat, width, height, format, type, data)
If the picture dimension is not a power of 2 (ie 53 x 87),
gluBuild2DMipmaps will scale it to the nearest dimension power of 2.
Note : With JOGL (not the JSR231 - It was
probably fixed), there seem
to be a little bug gluBuild2DMipmaps which make sometime an exception
(java.nio.BufferUnderflowException). That's why it is surrounded by a try/catch.
Here is the complete method that generates a texture from a picture already
read :
| in TextureLoader.java |
|
/* |
Picture loaders are internally used by the texture loader. These loaders are
used with readPicture method.
Picture loaders are flexible with the width range of possibilities for file
location supported :
Using TextureLoader |
TextureLoader textureLoader = new TextureLoader(); |
Before using texture, we need to know if textures are well loaded :
glIsTexture(textureName)
If we have textures that we don't use anymore, we can delete them to some free memory:
glDeleteTextures(nbNames, textures)
nbNames is the number of texture to delete in textures array.
textures is an array that contains texture
names.
Now the interesting part, we will apply out texture to a shape.
Here is the cube taken from the previous tutorial with a texture apply on it :

Cube textured
The cube is made of 6 quads. We will apply our texture to each plane of the quad.
In the previous tutorial, we have seen to draw a quad, we draw its 4 vertices.
For each vertices, we apply color the coor first with glColor,
then we specify its coordinates with glVertex.
With texture, we need to specify in addition the coordinate of the texture to
be applyed on the vertex. Texture coordinates are define using the following method :
glTexCoord2*(s, t)
A vertex is represented by 3 coordinates (x, y, z) in a 3D world.
Texture coordinates are (s, t, r). Here, we have a 2D texture, so we only use
the two coordinate s and t.
Advanced
We will see in following tutorials that there are 4 coordinates (x, y, z, w) for a vertex and a texture coordinates (s, t, r, q).
The cube can be view from the outside or the inside. Each plane
(here wuad) have two sides.
One side is the front face (GL_FRONT) and the other is the back face (GL_BACK).
The face orientation depends on the order that vertex are drawn.
The front face is the side in which vertex are drawn in the counter-clockwise order (opposite clockwise). The back face is the other side.
In the following pictures, you can see 3 faces of the cube. There are all draw
in counter-clockwise order, they are all front faces.
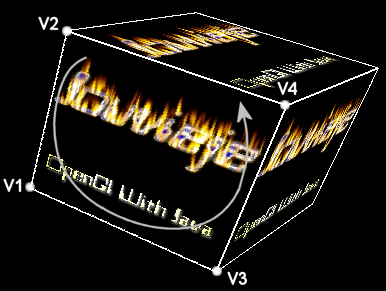
Front face : vertex drawn in the counter-clockwise
Since we hide back face to optimize performance (glCullFace), we have to care about the orientation of the faces.
For the face shown in the picture, we have to draw vertex in this order :
V2, V1, V3, V4
We have seen in Tutorial 4 how to determine the
vertex coordinates.
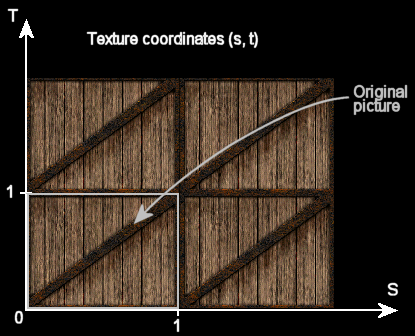
Now, we will see how to determinate texture coordinate. Let see the following
picture :
You can remarks that the texture is repeated 4 time in the picture (I only draw the texture for the interval [0, 2]).
Outside the range [0, 1], texture is either repeated or clampted. This is
defined with glTexParameter :
gl.glTexParameteri(GL_TEXTURE_2D, GL_TEXTURE_WRAP_S,
GL_REPEAT)
gl.glTexParameteri(GL_TEXTURE_2D, GL_TEXTURE_WRAP_T,
GL_REPEAT)
Default values for GL_TEXTURE_WRAP_S and GL_TEXTURE_WRAP_T are GL_REPEAT.
See advanced part for more informations on these two properties.
We need to associate the vertex to the following texture coordinates like this :
V2 associated with texture coordinate (0, 1)
V1 associated with texture coordinate (0, 0)
V3 associated with texture coordinate (1, 0)
V4 associated with texture coordinate (1, 1)
Associating a texture coordinates to a vertex is like to 'paste' the texture
on the shape by corresponding vertices coordinates ans texture coordinates.
Code looks like :
| Drawing of the textured cube (1) |
Method 1 : using GL_QUADS |
It is a little differents to apply texture on the cube using the second method view on the previous tutorial. This is for that reason that I explain it in more details here.
After we have drawn the first quad (V2, V1, V4, V3), texture coordinates for the vertex V4 and V3 are already setted. We are on the right edge of the texture.
But, we have seen that the texture is repeated after this edge (with
GL_REPEAT). So, for the quad 2 (V4, V3, V6, V5), we
take advantage of the repeatition by using the range [1, 2] for s coordinate.
And so for the quad 3 and 4 ...
| Drawing of the textured cube (2) |
Method 2 : using GL_QUAD_STRIP |
![]()
Your can creating your own picture to generates a texture.
Just fill the one dimensionam byte array by your own. Look at the pixel
storage model :
Pixel colors storing
RGBPicture and
RGBAPicture are utility classes for
representing and manipulating easily 2 dimensional picture (either in RGB or
RGBA mode).
See Tutorial 21 for creating some picture effect using these
classes with PictureEffects class.
The Framebuffer is detailed in Lesson 5 : Buffers.
For this tutorial, framebuffer is a buffer containing the frame color ie color
of each pixels of the frame(and more).
You can copy the entire (or only a part) of the current frame.
This method copy a rectangle of the frame into the target texture :
gl.glCopyTexImage2D(target, level, internalFormat, x, y, width, height, border)
(x, y, width, height) is the rectangle of the framebuffer to copy.
This method copy a rectangle of the current frame into the target texture,
starting from an offset :
gl.glCopyTexSubImage2D(target, level, xOffset, yOffset, x, y, width, height)
(xOffset, yOffset) is the offset
from which the framebuffer rectangle will be copied.
An application of this is the technique commonly called 'Render to texture'.
Instead of rendering the scene to the screen, it is rendered in a texture. The
texture can be used afterwards for multiple uses. Some effects are based on this like Motion Blur ...
In this tutorial, this is used to take a "frame shot" towards a texture
that is then used to apply on the cube.
The viewport is resized to fit the texture size. The, we draw the frame and
copy it towards a texture with glCopyTexImage2D.
| "Frame shot" |
/* |
We have seen in this picture that texture is repeated due to the default values : GL_REPEAT of GL_TEXTURE_WRAP_S and GL_TEXTURE_WRAP_T.
An other value for these properties can be GL_CLAMP. The result of this value is that texture coordinate superior to 1 is considered as equals to 1.
The resulting of this code :
gl.glTexParameteri(GL_TEXTURE_2D,
GL_TEXTURE_WRAP_S,
GL_REPEAT);
gl.glTexParameteri(GL_TEXTURE_2D, GL_TEXTURE_WRAP_T, GL_CLAMP);
is represented in this picture :
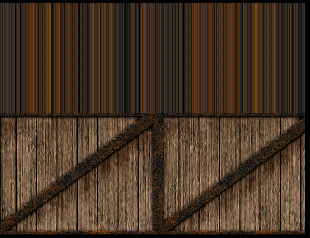
Texture Clamp
OpenGl can automaticly generating texture coordinates, for exemple to apply texture on
complex models.
We will see this in Tutorial 11.
An object with a texture map can be rendered close to the viewer
(huge object on the screen) or far to the viewer (object will appear tiny on the
screen). To map the texture on the object, OpenGL has to filter the texture
(shrink or enlarge) to an appropriate size. The filtering operation can result
to some visual artefact
Mipmaps uses multiple pre-filtered textures with differents resolutions, ie, for
an original texture size 64x64, mimapping will created low resolution textures
32x32 16x16 ... (level of details). When using mipmapping, OpenGL will
automatically choose the appropriate texture level (ie appropriate texture
resolution) to map onto an object adequately to its size (in pixels) on the
screen.
Mipmap will use a more computation at loading and more memory consumption.
Using gluBuild2DMipmps will generate all mipmaps
(texture resolutions) and OpenGl will automatically use the correct mipmap level
when mapping the texture onto an object.
You can create each mipmap levels with glTexImage2D.
For this, call it for each mipmap with the correct value for the level parameter
(second parameter, which was left to 0 during this tutorial). High resolution
texture is the level 0, lower resolution is 1, and on for the other low
resolution textures.
Here is a little tool that display the picture and the texture generated with the data read from the picture file :
For picture badly displayed, you can detect if the problem come from the
reading code or the OpenGl code that generate the texture from reading datas.
To display your own picture with this tool, use this command :
java ... org.jouvieje.***.tools.PictureVisualizator
picturePath
Replace *** by either
gl4java, jogl or
jsr231.
![]()
P : pause/unpause rotation of the cube
S : take a shot of the frame
+ : use texture with the following picture format
- : use texture with the previous picture format
![]()
Remember to download the GraphicEngine-1.1.2 to run this tutorial !
Tutorial 5 src (307 ko) //Port to Jogl JSR-231 initially done by Magarrett Dias
Eclipse workspace for Tutorial 5 & JOGL JSR231 (1715 ko) //BaseCode & Tutorial 5 src ready to run with Eclipse (JOGL-JSR231 included)
If you've got any remarks on this tutorial, please let
me know to improve
it.
Thanks for your feedback.
![]()
![]()
| Copyright © 2004-2012 JĂ©rĂ´me Jouvie - All rights reserved. | http://jerome.jouvie.free.fr/ |