![]()
![]()
![]()
Blending is commonly used to make objects translucent.
To view and understand some blending effects, it requieres some learning on how OpenGl computes Blending. This is a little longer so I put this in a Lesson 3.
It is highly recommanded to read it for an accurate understanding of this
tutorial.
![]()
In this tutorial, we will see some blending application, the
technique part is written in Lesson 3.
![]() Make an object translucent
Make an object translucent
![]() Mixing Pictures
Mixing Pictures
![]() Filter effect
Filter effect
Many other other effects can be created with blending. This tutorial will
helps you understanding and create basic effects before trying to implement
more advanced effects.
Translucent objects is the common use of Blending.
Physically, opaque material blocks light. In case of translucent material, light
is not blocked and go throw him. That's why we can see an object that is behind
another.
Without blending, when an object is rendered, all pixels drawn replace existing
pixels in the frame buffer. Transparency can be achieved by adding the
translucent object's color (srcColor) with the existing color (destColor).
We can do this with the following factor :
gl.glBlendFunc(GL.GL_ONE,
GL.GL_ONE)
The Blending formula
defined with glBlendFunc is :
srcColor+destColor
Translucent object (1) |
... //draw the background |
In case of multiple translucent object, disable the
writting in the depth buffer (Lesson
3). Original depth value will be keeped and will let all translucent object
be rendered if they are closer than opaque objects.
You can control how the object is translucent. To do this, we will use the
alpha component of the color :
gl.glBlendFunc(GL.GL_SRC_ALPHA,
GL.GL_ONE)
The equivalent Blending formula is :
alpha*srcColor+destColor
Translucent object (2) |
... //draw the background |
![]()
Translucent object
I will show you how to mix textures using blending. We have two images
and we want to mix them by keeping 25% of the first one with 75% of the second
one.
Here, I explain two methods, based on the alpha value, to creates this effect.
To achieve this effect, we draw the first image with blending mode disabled
(first image can be the background of the scene).
After, we will to keeps only 25% of the color of this picture (ie 25% of its 'brightness').
At this step, this picture is the destination because it is already drawn in
the frame buffer. The source is the second image and we want 75% of its color.
To achieve this effect, we need to multiply the source color by 75% (which is
the source factor) and the destination color by 25% (which is the destination
factor).
We can notice the destination factor is 1 minus the source factor, so the
blending formula is :
srcAlpha*srcColor+(1-srcColor)*destColor
which can be translated to OpenGl (using Blending formula)
with :
// 3/4 of the src 1-3/4 = 1/4 of the dest
gl.glBlendFunc(GL_SRC_ALPHA, GL_ONE_MINUS_SRC_ALPHA)
The alpha value is 0.75.
Mixing two pictures (1) |
gl.glEnable(GL_BLEND) |
Here is second method to do exactly the same thing.
Instead of drawing the first picture at full brightness, we will keep only 25%
of its color. For this we will set a alpha value of 0.25 as source factor, the
destination factor will be 0 (GL_ZERO).
The second picture will be drawn with the same source factor but with 0.75 as
alpha. The destination factor is one (GL_ONE)
to keep all existing color (already blended with first step).
Mixing two pictures (2) |
gl.glEnable(GL_BLEND) |
By varying the mixing percentage between two pictures, I've made this little animation :
Mixing effect animation
This exemple show how to use blending to make a color filter.
Previous effect was based on the alpha value of the color, here we will use the
rgb color components.
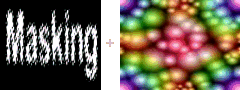
A mask is a picture which defines two areas. An area which
blocks color (black pixels of the mask picture), another area which leave
un-touched color (white pixels of the mask).
An exemple of this effect is shown by those pictures :
 |
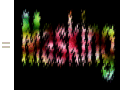 |
| Mask on pictures |
This effect can be used to apply a mask on the entire scene to clip a region of the scene (ex: sight of a weapon on a shooter game, binoculars ...).
One region can be used to render the scene, the second region for rendering the
menu
We draw the mask first with blending disabled. We obtain an area with black (0, 0, 0) or white (1, 1, 1)
pixels.
Now, we want to render the second picture only onto white pixels. This is
equivalent to multiply the source color with the destination color.
Effectively, where the destination contains black pixel then the result is
zero (blocked) and where the destination contains white color then the result
is the source color (keep un-touched).
So, we want :
srcColor*destColor
This can be achieved with (using ):
gl.glBlendFunc(GL_DST_COLOR, GL_ZERO)
//Blending formula with
these factors : srcColor*destColor+0*destColor = srcColor*destColor
Mask on pictures |
... //draw the mask |
Remark : This is equivalent to draw the image first, then the mask.
Note: If you want to draw on black pixel, try
GL_ONE_MINUS_DST_COLOR instead of
GL_DST_COLOR.
Suppose that we have a photographic filter that blocks 50% of the red, 10% of green and 25% of the blue. The color that we saw is composed of 50% of red, 90% of green and 75% of blue of the original color.
We will see how to do this.
This filter is equivalent to multiply the (r, g, b) color by (0.5, 0.9, 0.75).
The background is already drawn (landscape for exemple), it is the destination.
The destination color is fixed and we can't modify it.
To multiply the destination by (0.5, 0.9, 0.75), we needs a source color equal to this value. To have this source color, you can create a picture in your paint program. Set the background to the color to (0.5*255, 0.9*255, 0.75*255)
ie (127, 229, 191).
Color Filter |
... //drawing of the background |
Here is a rainbow of color that is filter by the filter described previously. This animation below show the result with and without blending activated.

Enable/disable photographic filter
You can notice the red strip lose a lot of brightness. In the opposite, the
green strip keeps pratically its original brightness.
This method can be extended to a variable filter by using a filter picture with
variable color. For example, a high filter concentrated at the center which
becomes lighter at the bounds.
Note: the filter described here be achieved
without blending like described underneath, using blending is only valuable in
case of a variable filter.
Color Filter (without blending) |
gl.glColor3f(0.5f, 0.9f, 0.75f); |
![]()
1-6 : select a scene
B : enable/disable blending
+ : increase alpha value (for the scenes 1, 2 & 3)
- : decrease alpha value (for the scenes 1, 2 & 3)
![]()
Remember to download the GraphicEngine-1.1.2 to run this tutorial !
Tutorial 9 src (142 ko) //Port to Jogl JSR-231 initially done by Magarrett Dias
If you've got any remarks on this tutorial, please let
me know to improve
it.
Thanks for your feedback.
![]()
![]()
| Copyright © 2004-2012 JĂ©rĂ´me Jouvie - All rights reserved. | http://jerome.jouvie.free.fr/ |