![]()
![]()
![]()
This tutorial use the scene created in the
tutorial 7.
The scene is drawn three times in 3 different Viewport (see Lesson 1).
Each viewport display the scene from different positions.
I modify a little the scene by addingh clipping planes. Clipping plane are used to "cut" the shape.
The Viewport is the 2D region of the screen in which the 3D
scene is projected. To know more about viewport, read Lesson 1.
Until then, we have set the Viewport as the whole part of our OpenGl component.
Now, we will creates differents Viewports that takes 3 differents region of our OpenGl component.
The three viewports are represented in the following picture :
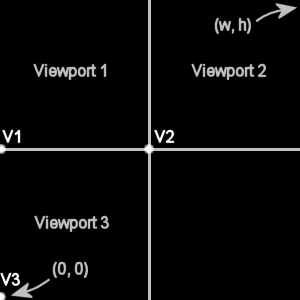
Three Viewports of the scene
To defines the rectangle of each viewport, we use the bottom left point of
each viewport (represented in the above picture as V1, V2 and V3) and the
viewport dimension (width x height).
gl.glViewport(x, y, width, height)
(x, y) is the bottom left point of the viewport
(width, height) is the dimension of the viewport
Warning, the point (0, 0) is the bottom left point of the OpenGl component.
The code is shown here.
The same scene is draw in our three Viewports. The only difference is that we look at the scene
from differents places.
It is very simple to do this. We only have to set the eye emplacement, direction and the upwards vector using gluLookAt :
glu.gluLookAt(eyePosX, eyePosY, eyePosZ,
lookAtX,
lookAtY,
lookAtZ,
upX, upY, upZ)
(eyePosX, eyePosY, eyePosZ) is the position of the eye in the scene.
(lookAtX, lookAtY,
lookAtZ) is a point on the view direction.
(upX, upY, upZ) defines the vertical direction.
The up direction is always vertical axis, ie (0, 1, 0). Also, the poit we look
at is always the scene center, which is (0, 0, 0).
The only thing we change is the eye position :
1)
eye is positionned
in front of the scene,
ie (0, 0, zOffset)
2)
eye is positionned
in the back of the scene, ie (0, 0,
-zOffset)
3) eye is positionned over and in front of the scene, ie (0,
zOffset, zOffset)
I've added some clipping plane in the scene from
Tutorial 7. Clipping plane are used to clip ('hide') a
region of the space.
Clipping planes was introduced in Lesson 1.
To use the first clipping plane, we use :
double[] eq = {a, b, c, d}
gl.glClipPlane(GL_CLIP_PLANE0, eq)
gl.glEnable(GL_CLIP_PLANE0)
a, b, c and d values are the values of the plane equation (see underneath).
The points that will be keeped are all points (x, y, z) that verify this inequality
:
a*x+b*y+c*z+d >= 0
I will show you how to find the first plane equation (cylinder). I let you do the same thing for the other planes.
Here is the complet cylinder, the axis system and the clip plane at the Time T1 (ie
no rotation of the cylinder) :
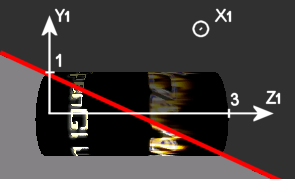
Cylinder clipping plane
The red line represents the clip plane. The dark part (over the plane) are the part that should not be
hidden.
Finding the plane equation can be a little difficult. Instead of finding the plane equation, we will search the red line equation.
We can do this because the intersection between the clipping plane and Y1-Z1 plane
does not depends on X1. The result of this is a = 0, the clipping plane equation
becomes :
b*y1+c*z1+d = 0
This equation can be re-written like as follow. This is a line equation (red line equation).
y1 = a*z1+b //a and b are not the same constants than before
The equation of a line is really easy, we just need the coordinates of the two
intersection points.
The a and b values are shown in this picture :
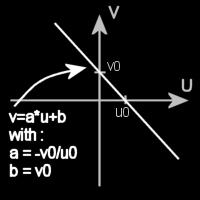
Line equation : v=a*u+b
In this case, we have : u is z1, v is y1, u0=1.5 and v0=1.
So, the red line equation is :
y1=-2/3*z1+1
Here, we only keeps the part under the red line that is to say all points that satisfy the
inequality :
y1<=-2/3*z1+1
That is to say that we keeps all (x1, y1, z1) points that satisfy :
-y1-2/3*z1+1 >= 0
Finaly, we deduce the a, b, c and d constants of the plane equation with :
double[] plane0Eq = {0.0, -1.0, -2./3., 1.0}
Remark :
The two first clipping planes moves with their associated shapes in contrast
to the last clipping plane which is fixed.
The reason is that the rotation was called after the definition of the
clipping plane.
| drawScene |
//plane equations |
![]()
P : pause/unpause movements
![]()
Remember to download the GraphicEngine-1.1.2 to run this tutorial !
Tutorial 8 src (9 ko) //Port to Jogl JSR-231 initially done by Magarrett Dias
If you've got any remarks on this tutorial, please let
me know to improve
it.
Thanks for your feedback.
![]()
![]()
| Copyright © 2004-2012 JĂ©rĂ´me Jouvie - All rights reserved. | http://jerome.jouvie.free.fr/ |