![]()
![]()
![]()
Components are usefull things. They can be used to creates menu, credits, interactive interface ...
I've used them for my first little game SokobanGl.
I've currently implemented these following components :
![]() Label
Label
![]() PictureBox
PictureBox
![]() List
List
![]() CheckBox
CheckBox
![]() TextField
TextField
There are not fully implemented like Java's components, but I think that you can do a lot of thing
with them. Components support events (mouse, key ...), states (enable, visible ...) and other
particular properties.
I've passed long time to optimize components and fix bugs. I think that they are now usable.
If I forgot some thing, tell me. This tutorial needs feedback from yourself.
I wait your remarks and suggestions.
![]()
This tutorial is a little different than previous. I will not explain you how I've create it,
just how to use it !
The reason of this is that you already have all necessary OpenGl knowledge. The new here is the
use of "AWT" code. I don't want to write a tutorial about how to create components. I think that you can find many resources on the web for that (The Java Tutorials).
But, if you have any problem understanding something in the code, I'm here for all your questions.
Hierarchie
Here are all classes related to the OpenGl Component :
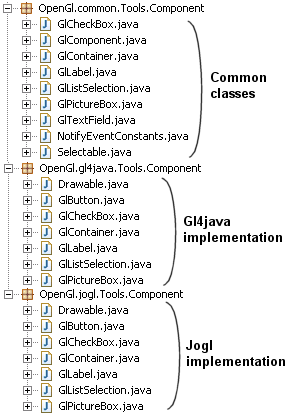
Classes related to components
The first package store common classes for Gl4java and Jogl. This is the basic
implementation of all components. Is is independant of the OpenGl API choosen.
The two others packages finish the implementation of the components for each OpenGl APIs (ie Gl4java
and Jogl).
This component can be compared to a 'classic' Label.
It display a 2D text in an OpenGl scene. Font used to draw the text can be defined with a
FontPrinter or any object that implement
GlPrintable. Take a look on Tutorial 20
to know more about this.
You can attach key, mouse and mouse motion events like you do with awt & swing components.
The color of the text can be customized depending on the mouse state (over, down) and on the
component state (enable).
![]()
GlLabel
This component can be compared to a 'classic' TextField.
It is used to read an input text from the user.
The implementation of this component is not finished ...
This component display a picture.
The picture displayed come from a texture. Alpha layer is supported for translucent textures.
You can attach key, mouse, mouse motion and action events like you do with awt & swing components.
The picture displayed can be customized depending on the mouse state (over, down) and on the
component state (enable).
![]()
GlPictureBox
This is similar to GlPictureBox.
In addition to all GlPictureBox properties, this component have a
select state (to know if the user have selected it or not). This allow to specify a particular
picture to display when the component is selected ...
This component display a list of choice. Each choice is display as a 2D
text.
You can attach key, mouse, mouse motion and change events.
![]()
GlListSelection
This component can be compared to a 'classic' CheckBox.
By default, it display a GlSelectButton for the box to
check/uncheck (state component) and a GlLabel for the information
(data component).
You can use 5 differents styles for the check box. The first style (STYLE_1)
is created with some picture taken from a demo from the Sun's jdk (SwingSet2). The others are created by me.
![]()
Default GlCheckBox (STYLE_3)
But, you can customize it by using a particular component for the state and/or the data components.
![]()
Custom GlCheclBox with a GlPictureBox
- What is the state and the data component of a GlCheckBox ?
A GlCheckBox is container. It use two components called state and data component.
Here is a representation of these two components that compose the check box :
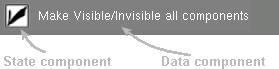
State and Data components
It is a container of GlComponent.
This is usefull in case of use of multiple components. You only have to add them into the
container, then call glPaint for the container and dispatch
events to the container like this :
Linking drawing and events |
//Initialization |
Then, all components will be drawn and will receive all events.
Here is an exemple that add a label and a picture box to a container, draw
the components and add events :
Exemple |
|
public void drawGlScene(GLDrawable glDrawable) |
![]()
Remember to download the GraphicEngine-1.1.2 to run this tutorial !
Tutorial 25 src (83 ko) //Port to Jogl JSR-231 initially done by Magarrett Dias
If you've got any remarks on this tutorial, please let
me know to improve
it.
Thanks for your feedback.
![]()
![]()
| Copyright © 2004-2012 JĂ©rĂ´me Jouvie - All rights reserved. | http://jerome.jouvie.free.fr/ |