![]()
![]()
![]()
This tutorial is the first part on the light series tutorials.
It shows how to create a simple light that light up an object.
In Tutorial 13, we will see how to create 3 kind of lights
(directional, positional and spot).
In Tutorial 14, I will describe you each light
properties (ambient, diffuse, specular and emission) and I will introduce you
material with OpenGl.
![]()
Lesson 6 describe more
technical informations about light and material. This can helps you understand
how light/material are modelized by OpenGl.
Light properties can be defined with :
gl.glLight*(light,
parameter,
value)
light is the light GL_LIGHTi, i
goes from 0 to 7. Each indice is an identifier to a light.
In OpenGl, we can use up to 8 lights.
parameter is a light property. Here, we will use only light with
ambient and diffuse color. Other
properties will be shown in next tutorials.
![]() GL_POSITION light position
GL_POSITION light position
![]() GL_AMBIENT ambient
light color
GL_AMBIENT ambient
light color
![]() GL_DIFFUSE
diffuse light color
GL_DIFFUSE
diffuse light color
Like with texture, to enable lighting we have to call glEnable :
gl.glEnable(GL_LIGHTING)
Now lighting is enabled, we will enabled light source we want to use :
gl.glEnable(GL_LIGHTi)
This code creates the light source at the position of the small sphere
representing light source position :
Light source |
float[] lightDiffuse = {1.0f, 1.0f, 0.0f, 1.0f};
//yellow diffuse : color where light hit
directly the object's surface |
The light source (tiny sphere) illuminating the cube :
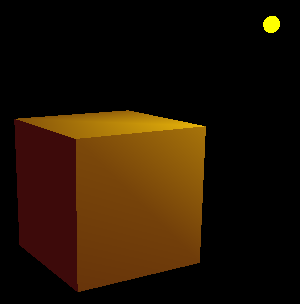
Ambiant/Diffuse light source
Light illuminate a surface depending on the surface orientation (surface
normal).
To light-up a shape, we need to define surface normals.
The normal is the perpendicular vector of the surface tangent plane (in case
of the surface is curvated). If the surface is already a plane (ie traingle,
quad...), the normal is just the perpendicular of the plane.
Normal must be unit vector (to optimize performance).
Normals points towards the outside of the surface. This define the side that
should be lit by light rays.
In case of two sides lighting model, the inside will also be lit.
Normal vectors of the sphere are already include in the glu method. I show you
how to add normal vector on the quad from Tutorial 04.
Normals are represented in yellow on the picture of the quad :
 |
 |
Quad of Tutorial 04 |
Quad with normal vectors |
Normal vector is applied to a vertice. Normal vector is used same as for color and texture coordinates that normal vector applied to a vertex is the current normal vector.
The current normal vector is defined by this :
gl.glNormal3f(x, y, z)
(x, y, z) is the normal vector
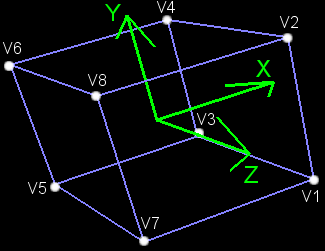
Here, we have 6 surfaces so 6 normal vectors (one by surface).
N1 (normal of the face 1) is along the x positive axis : (1, 0, 0)
N2 is along the z negative axis : (0, 0, -1)
N3 = (-1, 0, 0)
...
I let you search the other normal vectors.
Here is all the code to draw a white quad that can be ligh up by a source :
Quad + Normal vector |
gl.glBegin(GL.GL_QUADS); |
![]()
Go to next tutorial for more about lighting.
Previously, we have seen how to intuitively find normals on a simple cube.
To find normals on more complex shapes, this approach become unusable. That's
why I will describe a pure mathematic approach to find normals for your shapes.
Complex shapes are mostly made of a lot of tiny triangles and/or quads, they are
called face. This is an approximation of the real shape. For example, a sphere
is composed of many quads. Number of quads is in direct relation to the sphere
quality.
Now, supposed any plane for which we now 3 points (ex 3 vertices of a triangle).
With these points, we can trace 2 lines on the plane (edge1 and edge2). With a
cross product of these two lines, we find a vector perpendicular to these line
ie perpendicular to the surface. So, we have found a normal vector of the
surface.
Triangle/Quad normals |
|
//Extract 3 vertices of a quad/triangle |
Does the normal found point towards the outside or the inside of the shape
?
The answer can't be determinated because outside or inside notions are abstract
visual notions.
This question can be reformulated as Does the normal found is the front
face's normal or the back face normal ?
For front face and back face notions, take a quick look at
tutorial 5.
If the face is a triangle/quad/polygon, the normal calculated here is the normal
of the front face if the face is drawn this way :
|
Face rendering for front face normal |
|
//Face rendering (per face lighting) |
Before, we have calculated face normals. Resulting lighting is a per face
lighting, a face have the same normal everywhere. This result to a flat
transition between face.
Per vertex lighting is a smooth version of per face lighting. Instead of
defining a normal at each face, we define a normal at each vertice.
This result to a smoother rendering result. Such lighting contribte to improve
rendering quality of curvated shapes.
To compute per vertex lighting, start by calculating each face normals. Then,
loop over each vertices and find all face which share this vertice. The vertice
normal is the mean of all face's normal found. Calculating per vertex normal at
runtime is intensive cpu calculation, especially for big shapes.
|
Face rendering for front face normal |
//Face rendering (per vertex lighting) |
Per pixel lighting is the bester lighting model. This can't be
implemented in a classic rendering because we have only have access to vertice.
Such lighting model can be implemented on (recent) gpu using shaders.
For an implementation of per face and per pixel lighting on a spring shape, look
at tutorial 23.
For an implementation of per face/per vertex/per pixel lighting with shader,
look at the great Bonzai Engine.
![]()
Remember to download the GraphicEngine-1.1.2 to run this tutorial !
Tutorial 12 src (132 ko) //Port to Jogl JSR-231 initially done by Magarrett Dias
If you've got any remarks on this tutorial, please let
me know to improve
it.
Thanks for your feedback.
![]()
![]()
| Copyright © 2004-2012 JĂ©rĂ´me Jouvie - All rights reserved. | http://jerome.jouvie.free.fr/ |